Tuesday, February 22, 2011

Sweet & Spicy Pork Tenderloin

This is one of the first original recipes I've come up with that I absolutely love. It went over very well with the family and I definitely intend on making it again.
Pics will be up as soon as I can find batteries for my camera!
2 words of warning about working with tenderloin:
1.) They always take longer to cook than a recipe will say.
2.) It is really easy to overcook a tenderloin for fear of it being too rare. I always cook all of the pink out of mine, but leave it juicy. There is a little cushion that you can take comfort in. If the inside still has a SLIGHT pink tint, it's ok. That's how restaurants serve it.
Ingredients:
1 pre-packaged pork tenderloin UNSEASONED/ORIGINAL
Dry Rub:
2 tsp salt
1 tsp paprika
¼ tsp all spice
Saute:
1/8  cup brown sugar
3 tbsp olive oil
¼ tsp crushed red pepper flakes
**Optional Butter Sauce for Extra Sweetness2 tbsp butter
½ tsp crushed red pepper flakes
2-3 tbsp brown sugar
Directions:
1.) Pre-heat oven to 450°.
2.) Cut tenderloin in half.
3.) Mix Dry Rub ingredients and rub thoroughly into both halves of the tenderloin.
4.) Heat Saute ingredients in non-stick skillet over medium-high heat.
5.) Place tenderloin halves in skillet and brown on both sides (5-7 mins depending on stove).
6.) Transfer tenderloin to cooking sheet or broiling pan and bake for 30-45 mins or until cooked through.
7.) Let rest 3-5 mins, slice and serve.
**8.) To make butter sauce, simply combine all ingredients in a pan stirring frequently until reduced to desired consistency. It can be a thin dipping sauce or a thicker, syrup like glaze.

Wednesday, February 2, 2011

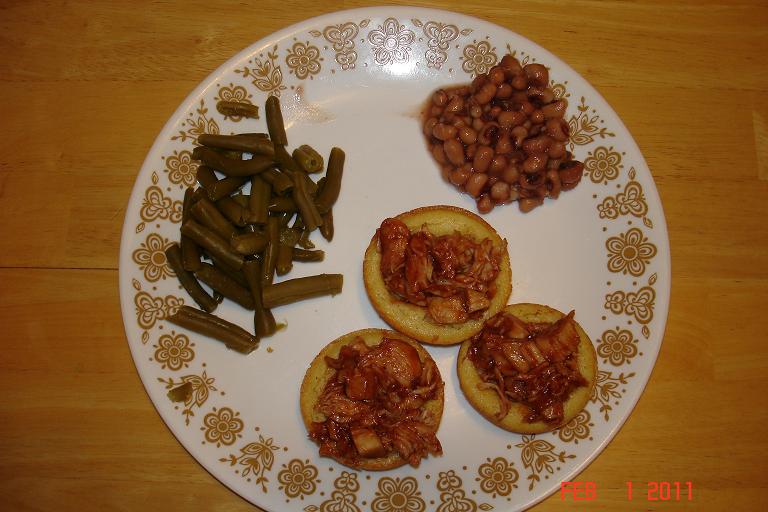
Recipe 16: Chicken in a Cornmuffin

Prep Time: 10 mins
Cook Time: 40 mins
Eat Time: ASAP!

I love southern food. If it wasn't such a hassle to make fried okra, I would eat it with every meal, every day. And, I'd weigh a thousand pounds. Southern food is comfort food to me. Drop biscuits with sausage gravy; sweet tea and pork chops...they're better than a warm blanket.

Tonight's dinner was inspired by Paula Deen's spin on a classic combo: BBQ chicken served with cornbread. Instead of serving them side-by-side, I made them into something new.


A few notes, I love sweet cornbread. I don't want it any other way, and I hate shredding chicken, but it really does make the recipe easier to eat.

Ingredients:

3 chicken breasts
1 bottle of your favorite BBQ sauce, I used original Sweet Baby Ray's
2 1/2 tbsp butter, melted
2 eggs, beaten
1/3 cup vegetable oil
1 tbsp honey
1 1/4 cup whole milk
1/2 cup cornmeal
1 1/2 cup flour
3/4 cup sugar
1 tbsp baking powder
1/2 tsp salt

Directions:

1.) Heat oven to 350 degrees.
2.) In a large pot, put entire bottle of BBQ sauce and heat on medium.
3.) Cut chicken into large pieces, just to aid with cook time and absorption.
4.) Place chicken in pot with BBQ sauce and cook on medium heat for 40-45 minutes.
5.) Melt butter in microwave, set aside.
6.) In a separate bowl, beat eggs. Add vegetable oil, honey, and milk.
7.) In a mixing bowl, combine cornmeal, flour, sugar, baking powder and salt. Stir together.
8.) Pour in wet ingredients and melted butter. Stir until smooth.
9.) Pour into well-greased muffin pan. (only fill muffin slots half way).
10.) Bake 10-15 mins or until golden.
11.) While the muffins are still warm, use your thumb or a spoon to depress the middles of the muffins. Be careful not to get to close to the edges or they will not hold together.
12.) Remove chicken from pot and shred (or cut finely). Make sure all surfaces are coated with sauce, but not dripping.
13.) Spoon chicken into depressed muffins.
**Add a little salty kick with finely chopped dill pickles

Serve this with classic southern sides. We did black eyed peas and green beans, but baked beans, mashed potatoes and okra would be amazing.

I hope you love this as much as I did. It's officially my new favorite. I think meatloaf has been surpassed!

Tuesday, February 1, 2011

Recipe 15: Oat, Raisin and Chocolate Krispy Treats

My son and I spent the day snowed in together, and we made treats to keep from going crazy. This was his special creation. I have to say, they turned out great.

Ingredients:

3 tbsp butter
2 cups marhmallows
2 cups Krispy treat cereal
1/4 cup oats
1/4 cup chocolate chunks
Raisins--add to taste

Directions:

Follow the steps in Recipe 14, but add oats, chocolate and raisins when krispy mix cools. Try forming into a well-greased muffin pan for fun circle treats.

Recipe 14: Toffee and Chocolate Krispy Treats

Cook Time: 5 mins

Simple! These are just regular krispy treats with dark chocolate chunks and Heath bits added into the warm krispy mixture. I then finished the treats with Heath and chocolate bits when they had cooled.

Ingredients:

3 tbsp butter
2 cups krispy rice cereal
2 cups marshmallows
1 oz dark chocolate, finely chopped
1/2 oz Heath bits (or bar finely chopped)

Directions:

1.) Melt butter in a non-stick pot
2.) Add marshmallows and stir until melted completely.
3.) Remove from heat.
4.) Add cereal.
5.) Mix in chocolate and toffee bits.
6.) Form into pan.
7.) When cooled, top with toffee and chocolate bits. 

We ate 3 batches of krispy treats today. These were my favorites!

Recipe 13: Tortellini and Toasted Ravioli

Prep Time: 3 mins
Cook Time: 15 mins

This isn't really a recipe because everything here is pre-made, but I wanted to offer another pantry-friendly meal for those of us who are iced in.

Dinner at my house tonight

Tortellini, Toasted Ravioli and a nice salad.

AND!! 3 variations of krispy treats. (recipes 14 and 15)

Ingredients:

1 tsp garlic salt
1 bag frozen tortellini (any variety)
1 jar spaghetti sauce
1 jar marinara
1 box frozen toasted ravioli
1 bag pre-cut salad (any variety)

**Parmesan cheese, one tomato, feta cheese and Parsley for garnish

Directions:
1.) Heat oven to 425 (or whatever toasted ravioli box says)
2.) Follow boiling directions on tortellini, but add the garlic salt to the water before you add the pasta for extra flavor.
3.) Dice one tomato while the pasta cooks.
4.) Drain pasta and add spaghetti sauce. Set aside.
5.) Cook toasted ravioli according to directions on box. For extra crunch,  broil on High for 2 minutes after cook time.
6.) Rinse salad, add diced tomato and feta to salad. I like to add a bit of salt and pepper too because I don't really like salad dressing.
7.) Heat marinara in microwave safe bowl for 1 minute.
8.) Top tortellini portions with Parmesan cheese and parsley and serve!

For those who don't like the gooey stuff inside tomatoes, try this to see if you like this healthy food: quarter the tomato. Use a knife to cut out the seeds, then dice them. This simple step has allowed me to fall in love with tomatoes!

Monday, January 31, 2011

Recipe 12: Chili/Stew

Prep Time: 5 mins
Cook Time: 10 mins
The incoming blizzard has inspired me!
I realize that it might seem like I cook everything from scratch. I don't. I would love to, but I don't honestly know enough of the basics, it would cost a fortune, and there is something to be said for convenience.
This is a super easy, from the pantry meal.
First, I'd like to pay tribute to how I was raised. My Mom loves sweet chili. She has always adds ketchup, syrup and some other secret good things to make her chili. The thick, rich concoction is perfect for cold days and partners so well with sweet cornbread.
There are certainly days where nothing else fills me up quite as well as Mom's chili, but most of the time I prefer my soups, stews and yes, even chili, to be lighter and more chocked full of veggies.
So, here's my variation of chili.
Ingredients:
2 large (25oz) cans chili
1 can diced tomatoes, undrained
1 can corn, undrained
½ orange bell pepper, chopped
½ green bell pepper, chopped
½ small onion, finely chopped (more or less to taste)
1 tsp chili powder
*Depending the brand of chili you buy, you may also want to add some extra beans. Kidney beans work well or stick with chili beans.
Directions:
1.) In a large saucepot, combine chili cans, onion, and extra beans*. These ingredients take a little longer to soften, so let them cook 3-5 mins.
2.) Add remaining ingredients and heat to boil.
3.) Serve warm—with toast for best results.
It mixes great with almost any vegetable: potatoes, carrots, etc. But, this is a very veggie-rich recipe, so if you're not a fan of vegetables (Melody), I wouldn't recommend it.  Otherwise, customize and dig in!

Thursday, January 27, 2011

Recipe 11: Oatmeal Cookies all grown up

Prep Time: 10 mins
Baking Time: 12-15 mins
Cooling Time: 20 mins

I cannot take credit for this delicious recipe. A wonderful woman at my church shared these cookies, and I practically demanded the recipe. My family loves them, even with the slight twists on classic oatmeal raisin cookies. They are sweet but not too sweet. Oat-filled but moist, and full of wonderful flavor surprises.

I can't get enough of the ingredients combined in this recipe; I've literally eaten a dozen of these in the last two days. And, I'm not even sorry.

1 cup flour
3/4 tsp cinnamon
1/2 tsp baking powder
1/2 tsp baking soda
1/2 tsp salt
1 stick unsalted butter, room temperature
1/2 cup brown sugar
1/2 cup sugar
1 egg, room temperature
1 tsp vanilla
2 cups oats
1 cup dried cranberries
4 oz dark chocolate bar, roughly chopped

Two pointers: Don't fear the cranberries, they are not tart. Don't use milk chocolate, the sugars sweeten the batter and milk chocolate makes the cookies overwhelming.

Instructions:
Heat oven to 350
1.) In medium bowl, whisk together flour, cinnamon, baking powder, baking soda and salt.
2.) With a mixer, mix butter & sugars until fluffy.
3.) Add vanilla & egg. Mix until smooth.
4.) Slowly add flour mixture.
5.) With a spatula or spoon, add oats, cranberries and chocolate. Stir until evenly mixed.
6.) Line a cookie sheet with wax/parchment paper.
7.) Using a cookie or ice cream scoop, make balls of dough. Flatten slightly.
8.) Bake 13-15 minutes until just slightly golden at the edged.
9.) Allow to cool 20 minutes before serving. (This is especially important if you are serving little ones because the melted chocolate really retains heat.)

Recipe 10: Zesty Roasted Chicken & Potatoes

Prep Time: 8 mins
Cook Time: 40 mins


The great thing about this recipe is that one sauce takes on two different tastes. The chicken doesn't absorb as much of the mustard and really shows off the garlic, chive taste while the potatoes pull in the creamier textures and almost make an easy potato salad--only not mushy.

Here we go.

Boneless chicken breasts (1 per serving per person)
1 lb red potatoes (cut into quarters or thick slices)
2 toes minced garlic
1/3 cup mayo
3 tbsp dijon mustard
1/2 tsp pepper
2 tbsp dill pickle juice (It just adds a salty/vinegar base to the potatoes)
Chopped chives (Fresh or jar) for garnish

Directions:
1.) Heat oven to 350.
2.) Grease baking pan.
3.) Wash and cut potatoes.
4.) Put cut potatoes in a microwave safe casserole dish with a lid. Add 1/4 cup of water and microwave for 5-7 minutes.
5.) Mix all ingredients except chives.
6.) Place chicken and potatoes on baking pan and coat with sauce. (It is easiest if you have a brush but spoons work just fine too.)
7.) Bake uncovered 30 mins. (May need longer for thicker pieces).
8.) Add chives to taste and broil until meat and potatoes are slightly browned.

One pan, one bowl, one casserole dish--super easy. Enjoy!

Wednesday, January 26, 2011

Recipe 9: Cadillo Stew

Prep Time: 10 mins
Cook Time: 1 hour

Last night was my first failed recipe in a long time. Just as all cooks, I have my strengths and weaknesses. Knowledge of meat cuts is a huge weakness of mine and the ultimate downfall of this recipe. Still, the soup and potatoes had good flavor, so I am going to show the recipe with my suggested changes

1 can (14.5 oz) diced tomatoes
1 lb cut stew meat my package was poorly cut, included a lot of fat and even some bone. It was too tough for the directions given and is only suitable for slow cooking over many hours. Instead I would use ground beef or spend the money to get a good chunk of meat and cut it  into cubes yourself.
1/4 cup flour
1 tsp salt
3 tbsp olive oil
2 garlic toes minced
1 large onion chopped
1 can diced chiles
2 large potatoes peeled and cubed

Two Important Tips:
1.) Prep work--cutting veggies, etc. SAVES you time and helps coordinate the timing of cooking.
2.) When you saute onions, garlic or other fragrant ingredients, you are really just heating them to the point that they release their flavor, so if you want to really flavor meat, let the veggies saute for a minute or two and then stir in your meat and simmer.

Directions:
1.) Chop Onion, cube potatoes
2.) Drain juice from tomatoes into large measuring cup. Add enough water to equal 1 1/2 cups; set aside.
3.) Add stew meat, flour and salt into a large zip-tight bag. Toss until meat is coated with flour mixture.
4.) In a 5-6 quart saucepot, heat oil over medium heat until hot. Add garlic and onion; saute 3-5 minutes or until tender, stirring occasionally.
5.)Shake off excess flour from stew meat; add to saucepot and cook 5 minutes, stirring occasionally until brown on all sides (if you use ground beef, you will need to drain the fat after it is browned)
6.) Stir in chiles, cook 5 minutes, stirring occasionally.
7.) Add potatoes, tomatoes and reserved tomato-water mixture.
8.) Cover and heat to boiling. Reduce to low heat; simmer 35-40 minutes until meat and potatoes are tender.

Again, the meat I got at the market was far too tough for the one-hour cook time. I would suggest using another meat or cooking all day.

Thursday, January 13, 2011

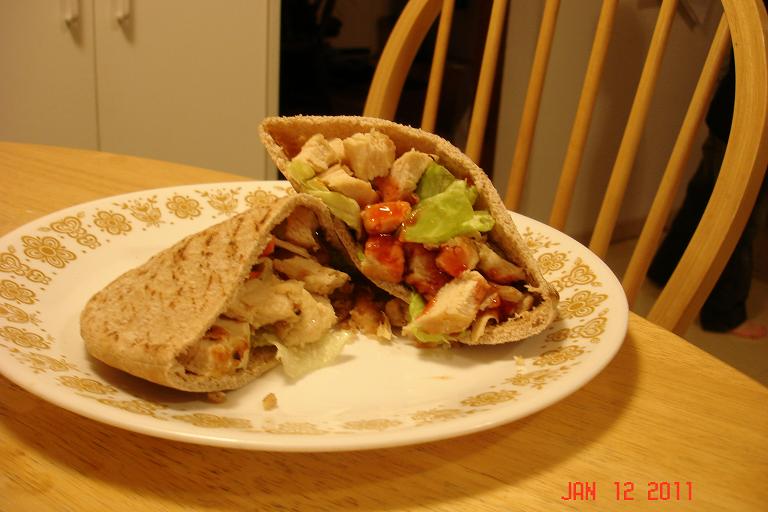
Recipe 8: Chicken Pita

Prep Time: 3 mins
Cook Time: 8-20 mins depending on thickness of chicken and amount cooked

True to form, I'm posting a recipe that is really easy to customize to your own tastes and whims.


The Basics

Boneless Skinless Chicken (as much as your family will eat in Pita form)
1/2 cup of flour
2 Tbsp Cinnamon
Olive Oil
Pitas
Any type of lettuce you prefer

1.) Coat the bottom of a large skillet in olive oil and heat on med.
     If you use a non-stick pan, your chicken will not brown, but it will cook.
2.) Combine flour and cinnamon in a large bowl. Lightly coat chicken with flour mixture.
3.) Fry in olive oil.
4.) Cut into bite-sized pieces and salt to taste.
5.) Put fresh lettuce in pita, top with chicken and your choice of sauce.

The great thing about this meal is the absolute versatility. With these basics, I was able to pacify so many different tastes in a house that sometimes has to be tricked into eating healthy.

For the grown-ups, I made a spicy/sweet sauce from mixing Sweet Baby Ray's Sweet and Spicy sauce with a little juice from a maraschino cherry jar for added sweetness and thinning. It was great and reminded me of McDonald's Southwest sauce. For my son, I just dabbed on some Ranch--the only dressing that exists before age 20. And, for myself, I plan to add some fresh tomatoes, fresh spinach and Caesar dressing for lunch tomorrow, just to have a new take on things.

Chicken is a great base. Though not flavorless, it is not overpowering, and greens go with anything, so go wild and try it all without having to make 30 different batches!

I know, I was pretty excited about that too.

Tuesday, January 11, 2011

Recipe 7: The Final Meatloaf Recipe

Prep Time:10 mins
Cook Time: 30 mins

I am a meatloaf connoisseur. I love it in almost every incarnation. Sweet with lots of ketchup like Mom's; savory and full of herbs; topped with gravy; made with the Lipton packets...I love them all. Over the course of 4 years, I have tried MANY varieties. Sorry to all my guinea pigs.

To all those who endured the overly greasy, sometimes too salty loafs, and to those who scooped through the ones that wouldn't stick together--I owe you a taste.

At long last, I found it. THE recipe, and now I will share it with you.


This is a double recipe. One pound comfortably fills 4 people. So, I make two at a time and vacuum wrap and freeze one loaf to make a night the next week easier. Yay vacuum bags by Ziploc!

Ok, recipe time. Here it is, the recipe 4 years in the making.

2 lb ground beef
1 tsp salt
1 small onion (more or less to taste)
2 cups Italian bread crumbs
2 large eggs
1/2 cup Parmesan cheese
1 Tbsp Parsley
1 toe minced garlic

Top with as much or as little ketchup as desired

1 green onion sliced
1 sweet tomato with the gooey stuff cut out and sliced
(These are separated out for a reason)

Bake at 400 for 20 minutes. At the 20 min. mark, take the loaf out, sprinkle on the green onion and evenly spread out the tomato and cook 10 more mins.

Monday, January 10, 2011

Recipe 6: Pork Paillard

First, I would like to apologize for being absent. I took some time to recover from the Christmas mayhem, then I was so sick I almost died. Not really, but it felt that way.

This recipe could just as easily be called "Thank you Food Network."

And this is not my picture. We were too busy eating to take pictures.
I did not make asparagus, either. I think it's a gross texture. I made fresh green beans.

The best part of the meal ended up being the veggies which I whipped up purely out of my head, but the rest was pretty good too.

1.) Mix 1/2 cup softened butter with chopped sundried tomatoes, thyme and sage to taste.
2.) Either pound pork thin (or buy it pre-cut that way) and coat very lightly in salted flour. Shake off all excess flour. Pan sear and cook through.
3.) Boil fresh green beans in water salted to taste like sea water for 5-8 mins.
4.) Strain green bean when at desired texture and put back in pan.
5.) Add 2 tsp butter, chopped tomato and thinly sliced green onions and sear lightly.
6.) Serve as pretty as you please and ENJOY!

Trust me--it's delicious.

Thursday, January 6, 2011

Recipe 5: Penne with Creamy Bacon Sauce

Recently, I had dinner at my dad's house and offered to help with some of the cooking--Shocking, I know. I wanted something easy but delicious and memorable.

I hit the mark.

My dad and step mom have two young children, and sometimes fancy recipes are a definite 'no,' but this recipe went over so well that my step mom requested the recipe. It was a proud moment.

This recipe is great for 3 reasons: it's 5 ingredients, so it's cheap; it's quick; it's great.

The sauce is just what it promises, it's creamy. The bacon provides a nice, salty bite and the noodles, if cooked right, keep the dish from going overboard. Plus, who doesn't like bacon, right?

Penne with Creamy Bacon Sauce

1 pound (1 box) penne noodles (Rigatoni also works well)
8 slices of bacon thinly sliced (add more to taste)--
if you leave the bacon slightly frozen, they are much easier to slice. Scissors also work well for this job.1 1/4 cup heavy or double cream
3 toes of garlic
1/2 cup grated Parmesan

1.) Cook noodles as directed
2.) Dry-fry bacon in a large frying pan over medium heat until crispy
3.) Add the cream, garlic and Parmesan
4.) Cook over low heat for 4 minutes
5.) Drain the noodles and combine


I encourage you to tweak this to your liking. If you love bacon, use a whole package instead of the prescribed 8 slices. If you want a richer sauce, add more cheese. Scale back on the garlic if you make it for a date. You get the picture.

Have fun!

Sunday, January 2, 2011

Christmas Celebration No. 50--An Epic Cake

Fair Warning: Please keep in mind that I admit first and foremost that I am not a decorator. I have ok ideas and absolutely no way to capitalize on them.
When I began planning all the wonderful things I'd be trying and making for the holiday season, I began imagining a spectacular cake for the joint family gathering. I wanted a 3-tier cake to decorate like a Christmas tree complete with a krispy treat star and snowman and brownie presents.


First things first. I learned how to ice a cake so that it looked (fairly) smooth.

1.) Cool the cake completely. 2-5 hours in the fridge!

2.) I tested homemade icing vs. the store bought and decided that Pillsbury did better than I could, so I bought 4 cans of white, vanilla icing,

3.) Add water to thin the icing slightly so it spreads without pulling the cake.

4.) Apply a layer of "I don't care what it looks like" icing. This is a tip I learned from Cake Boss. This icing creates a nearly friction-free surface to add your fancy icing to.

5.) Let first layer of icing cool and set up. I allowed my icing to cool one hour in the fridge, but it honestly could have used more time.

6.) Apply fancy icing. To make smoothing easier, dip your spreading device in hot water between swipes.

Taste is the most important thing. Devil's Food cake and white icing is a pretty sure bet, and the cake went over pretty well. My son's birthday celebration was done at the same gathering and he LOVED it, so was all worth it. I think with more practice I could really get good at it too.

Monday, December 27, 2010

No Cooking Today

That's right, I took the day off.

Today was kind of stressful. That's a lie: It was insanely stressful, and I took the day off from cooking.

I'm now thinking that was a bad choice. Cooking always makes me happy, and it makes me feel like I've accomplished something. So, on days when I choose to "take a break" I usually end up feeling like I do now--like I should have cooked.

At least I would be going to bed having eaten a real meal and not feeling so...underacheiving.

Oh well, there's always tomorrow. I have plenty more recipes that are begging to be tried.

Sunday, December 26, 2010

Christmas

I've been thinking about Grandma a lot this last week. I cut my hair, and it's now an updated version of the way she liked it best. It snowed, and I have avoided driving as much possible. And I cooked.

I cooked and baked enough to feed an army...or seven.

I baked six dozen cookies in Grandma's apron on Christmas Eve day, and I thought of her often as I gave up trying to tuck my hair behind my ear and put on a head band.

This was my first Christmas attempting the big meal. I planned for ham, yams, two kinds of stuffing, green bean/red potato casserole, corn, fresh bread, and shells and cheese and the only thing that went awry was the ham didn't cook as fast as the directions said. But I had built in extra time just for that particular annoyance, so it wasn't devastating.

In addition to the ginger bread cookies (I'm a terrible decorator)


I also baked a ginger bread cake

and made mini lava cakes (which no one ate because they were too full from the meal).

All-in-all, I'd declare the day a success. I hope that my family enjoyed eating the meal that I enjoyed cooking, and I might even ask to cook for the big family gathering next year. Here's to hoping.

I hope your Christmas was as wonderful as mine. Until next time, good luck in the kitchen.

Thursday, December 23, 2010

Recipe 4: Panko

I love chicken. Bonus: my family will eat chicken just about any way I make it. So, chicken is a good investment for us. The trouble is, chicken gets boring. There is really only so much that can be done, because at the end of the day, it tastes like chicken.

Last night, I tried a brand new breading called Panko breading. I saw a commercial for it for the first time last week and then saw it at the grocery store just a few days later, so I decided to give it a try.

So, last night, while Daddy held the new baby, the four-year-old watched a famous alien, and the rest of the family rested, I began my experiment.

Right away, I knew Panko had the potential to be great. The Asian-style breading has large pieces of crisp breading, perfect for extra crunch and no seasoning added. The flavorless base is perfect for me because I get to decide spices. Also, from one bag of Panko, I can have 2-3 full meals that don't all taste exactly the same.

To begin, I heated the oven to 425 and generously coated a broiling pan with cooking spray. Then I was able to move on to the fun part: picking my spices.

I toyed with the idea of adding lemon pepper to the breading mix and spraying a little lemon juice on top of the chicken, but I decided to play with the idea of Parmesan chicken.

I combined:
1/4 cup Parmesan cheese
2 tsp Oregano
1 tsp Basil
1 tsp Parsley
1 1/2 Panko bread crumbs
salt and pepper (to taste)
in a mixing bowl.

After coating the chicken breasts in eggs, I coated them generously with the Panko and laid them out on the broiling pan. I then topped them with some extra breading for even more crunch and popped them into the oven. Cooking time varies widely on chicken because of oven temps and breast thickness. Last night they took about 20 mins.

While those were cooking, I julienned some fresh carrots and diced white and red onions and a green pepper. Those I just seared on med-high heat in olive oil, salt and a bit of butter. I also added some canned potatoes that I had quartered for a bit more filling food.

I pre-sliced the chicken and portioned out the veggies into each plate (mostly because we were eating in the living room). I placed the chicken on top of the veggies and served up a meal everyone loved.

Monday, December 20, 2010

Recipe 3: Stew

There are a few great things about good stew. First of all, stew is completely customizable. Second, the leftovers are even better than the first servings. Here's a great one sent to me courtesy of Myrecipes.com.

Ingredients

  • 2  teaspoons  canola oil
  • 8  ounces  boneless center-cut pork chops, trimmed and cubed
  • 1  cup  chopped onion (about 1 medium)
  • 3/4  cup  chopped green bell pepper
  • 2  teaspoons  bottled minced garlic
  • 1  tablespoon  chili powder
  • 2  teaspoons  ground cumin
  • 1/4  teaspoon  salt
  • 1/4  teaspoon  freshly ground black pepper
  • 1/8  teaspoon  ground red pepper
  • 1/4  cup  no-salt-added tomato paste
  • 1  (15.5-ounce) can golden hominy, rinsed and drained
  • 1  (14.5-ounce) can no-salt-added diced tomatoes, undrained
  • 1  (14-ounce) can fat-free, less-sodium chicken broth
  • 1/4  cup  light sour cream

Preparation

Heat oil in a large saucepan over medium-high heat. Add pork to pan; sauté 5 minutes or until lightly browned. Add onion, bell pepper, and garlic to pan; sauté 5 minutes or until tender. Stir in chili powder and next 4 ingredients (through red pepper). Cook 1 minute, stirring constantly. Stir in tomato paste, hominy, tomatoes, and broth; bring to a boil. Reduce heat, and simmer 10 minutes. Serve with sour cream.

I doubled up on pork and hominy and threw in two cans of diced chiles and a can of corn for texture and a bit of natural sweetness to balance out the spice. Although my 17 year old brother didn't even try it (this is not a new phenomenon) the rest of the family enjoyed it.

Personally, I loved it. The spices were definitely not our typical cuisine and so it gave me something warm and different to look forward to for lunch today. It being another cloudy, cold winter's day just added to the soupy appeal. Yum.

Saturday, December 18, 2010

A Break for Some Tricks

I love cooking. Therefore, I love cooking shows. Not only is it entertainment, I get to learn new tricks of the kitchen to make my cooking life a little easier. I'd like to pass some of those on to you now.

Cracking an Egg
America's Test Kitchen on PBS taught me these tricks.
1.) Crack Eggs on a FLAT surface
     I know it's counter-intuitive, but the reason it works is because you gain access to the egg, but the inner shell membrane remains intact and keeps the eggshell from creeping into your bowl.
2.) Use eggshell to retrieve eggshell
     Anyone who has chased a piece of shell around a bowl of squishy egg guts knows it isn't easy. They simply do not want to come. For whatever reason, though, the shells are attracted to each other and allow you to lift stray bits right out!

Softened vs. Melted
There is a difference. Over heating butter leads to wet dough and shapeless cookies.

Chopping and Onion
Neatest trick ever!
Video version http://www.reluctantgourmet.com/cut_onion.htm
1.) Slice the onion in half.
2.) Set the onion on your cutting board sliced side down.
3.) Cut following the natural sections of the onion but only go 3/4 through.
4.) Make horizontal cuts 3/4 of the way through as well.
5.) Then set your blade on end like you would normally chop and chop away.

This has saved me many frustrating hours in the kitchen, I assure you.

Hope these tips help you as much as they have me!

Thursday, December 16, 2010

Recipe 2: Candy Cane Cookies

I promised you tales of success, and now I shall provide.
I would first like to offer my thanks to Betty Crocker, or at least to the people who printed a holiday baking guide with tear-out recipe cards in her name. They're great.
Candy Cane Cookies!

This is a definite party-friendly cookie. It's easy to make, cute, festive and has a refreshing, unexpected taste that people will remember!
Things I learned while making Candy Cane Cookies:
1.) There is such a thing as Peppermint Extract
2.) It's more fun to hand someone a Candy Cane Cookie and watch them try it than it is to explain what it is. They look like sugar cookies. It's a nice trick.
These cookies are very easy to make as long as you don't follow the recipe card exactly. Here is my modified version.
1/3 cup butter, softened
1. Heat oven to 375 °F. In a large bowl, beat butter, shortening and sugar with an electric mixer on medium speed until light and fluffy.
2. Beat in egg, peppermint extract and food dye of your choice (if you want to color the cookie). Read below for more options
3. Take about ½ tablespoon of dough in your hand and roll into a long, even line. Place on cookie dough sheet and form into a cane.
4. Bake 5 to 8 minutes or until edges just start to brown. Immediately move to cooling rack (BE CAREFUL, the tips break off‼).
5. Follow directions for melting almond bark. Coat entire cookie evenly.
6. Put a few drops of any food dye into a dish. Take cheap (replaceable) paintbrush, dip in dye, and paint on stripes!
¼ cup shortening
½ cup sugar
1 egg
1 ¼ cups flour
¼ tsp baking powder
¼ tsp salt
1 tsp peppermint extract

Food coloring
Vanilla-flavored candy coating (almond bark)

The original card makes two mistakes. First, it tells you not to add the peppermint extract and red dye until the dough is formed which creates issues with even distribution of color and pepperminty goodness. Then, it tells you to use a fancy cookie dough press to make long strips of dough which you later form into canes.
I can tell you that adding the peppermint extract during the mixer phase makes things much more consistent. I can also tell you that my mother has a fancy cookie dough press and it was terrible for this project. They are designed to make flat cookies, not dough lines. Rolling the dough by hand and forming individual canes is much easier.
In my first batch, I dyed the dough as prescribed, however, I found that I liked the crisp texture of the hardened almond bark combined with the soft cookie so much that in my second batch, I coated the entire, non-dyed cookie with white almond bark and painted the stripes on. It sounds taxing but it looks a lot better and I thought it was easier.
I found it difficult to make consistent, attractive lines with melted almond bark. Not so difficult to take a little food dye and a tiny paint brush and have at it. Plus, it allowed me the freedom to use a bunch of different colors. Something my 4-yr-old thoroughly enjoyed.